Troubleshooting
Issues connecting with Plover
For issues with getting the keyboard to work with Plover, take a look at the debugging tips.
Troubleshooting the Asterisk
Important information
The Asterisk calibrates the sensitivity of each touch key when you first plug it in. When plugging in the Asterisk, grab the keyboard by the edges, without touching either the front or back of the touch keys so as not to interfere with the initial calibration process.
If you plug your Asterisk in while touching a key, it may not respond to touches until you recalibrate. Recalibrate your Asterisk by pressing the small "R" push button (reset button), located on the center of your Asterisk. Make sure you are not touch any touch keys while you press the reset button.
Keys not responding?
Problem: Some keys work, some keys don't work.
Solution: Recalibrate the touch keys by pressing the small "R" button in the center of your Asterisk. Make sure not to touch any touch keys while you do this. You can also try pressing both # keys (#-#) and wait for the light.
Keys don't work at all
Problem: My keyboard doesn't light up when I touch it, or it lights up but doesn't connect with Plover.
Solution: Try to use a different cable, different computer, or different port on the computer. Make sure that you have everything set up correctly with Plover.
Bent?
Problem: Keyboard wobbles on the desk.
Solution: Gently bend the keyboard to the desired flatness. Don't be too aggressive or the components will break off. Gentle bending is okay.
Too sensitive?
Problem: Keys are too sensitive to mis-touches.
Solution: You can try to adjust the sensitivity by pressing both * keys (*-*). You can press the * key multiple times to incremently adjust the sensitivity. Also, it is normal for beginners to make mistakes. Sometimes, all it takes is a more practice!
Keys are glitching
Problem: Sometimes keys work, sometimes keys don't work. Keys I'm not touching are getting pressed.
Solution: Make sure that you are using the Asterisk on a flat surface. If anything physically comes into contact with the Asterisk, even from the back, it can trigger a key press. Anything like a carpet or your lap may cause unwanted interference. Also, you may be pressing keys accidentally with your fingers. In such cases, you can remedy this through more practice.
Uni or Polyglot switches are not working
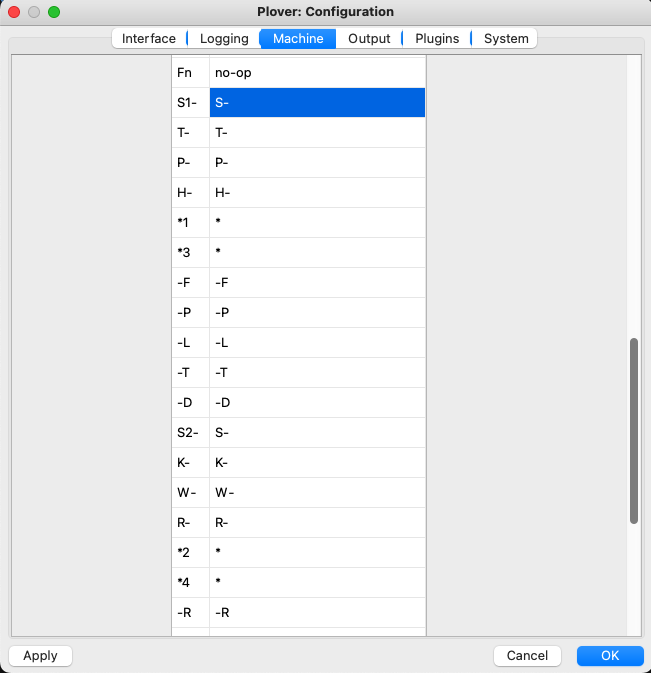
Solution 1: Check Plover machine key configuration
Go to Plover > Configure > Machine and scroll down to find the key mapping settings for your machine. Make sure that the key at issue is not accidentally marked "no-op" or left blank.
Solution 2: Opening the switch and bending the contact pins
If your switch sometimes works and sometimes doesn't, or it used to work and it suddenly has issues working reliably, it may be due to an unreliable connection inside the switch. If you recently bought the keyboard, you may be eligible for a replacement if you contact us through our store website. If you want to try repairing it yourself, here are the steps.
Tools
For this repair, you will need:
- Your hands
- One tweezer (preferably two tweezers)
Step 1: Understand how a switch works
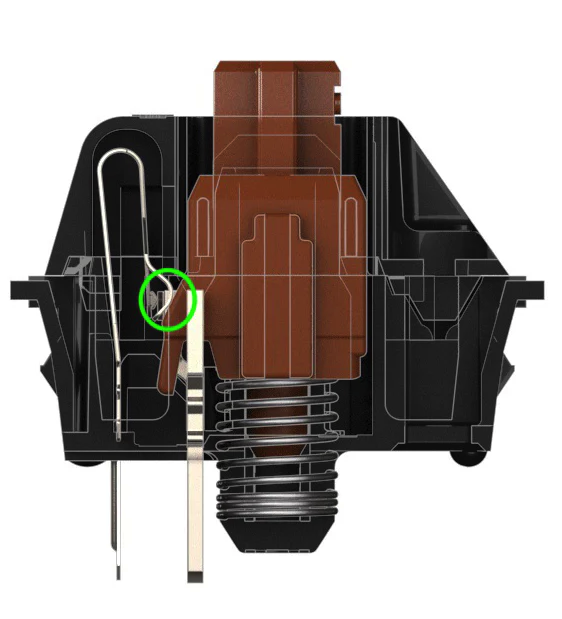
This is how a switch works: GIF Animation. As the stem (the red part) moves down, the metal leaf touches, completing the circuit. If the point where the metal touches is degraded, the switch may not work as reliably as it should.
The contact point is circled in the image below:
Step 2: Metal Bending
To repair the switch, we want to slightly increase the force where the metal leaves contact. We do this by gently bending the wires so that the contact is stronger.
Open up the top housing, like you would when spring swappingopen in new window, and inspect the copper metal leaf part.
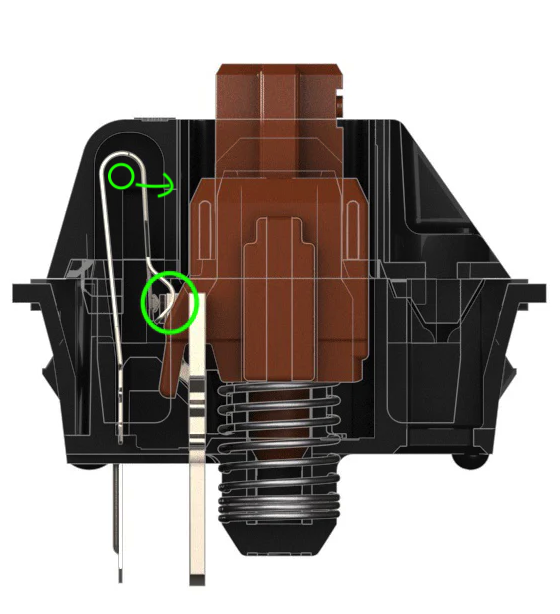
Put your tweezer between the top metal wire's "loop" as shown below, and expand the loop very gently, very slightly.
Step 3: Reassemble the switch
Carefully reassemble the switch. If you do it wrong you may end up damaging your switch even more. So make sure everything is aligned perfectly before you push down and snap everything back into place. See this video that shows you how to assemble the switch back into place: Spring Swapopen in new window
Test
Test it out using Plover. Hopefully it works! If not, feel free to contact us.
Solution 3: Replacing the switch
If you know how to desolder and solder a switch, you can try replacing the switch entirely.
Solution 4: Replacing the diode
Maybe the issue lies in the switch diode. If you are knowledgeable in electronics, test the diode using a multimeter, and if you determine that it is not working, you can replace the diode. The model of diode that the Uni and Polyglot use is any 1N4148W diodeopen in new window using the SOD-123 footprint.